
By Jim Hamel
Got free time? Here’s a little lesson that may help you pass the hours, or days, or weeks.
My guess is that you want your photos to be organized but don’t want to spend any time worrying about it. And you want to be able to find your photos quickly. There is nothing
worse than looking through a bunch of folders for a photo you know you have somewhere, but being unable to find it. At the same time, you don’t want to create a cumbersome system. It will not be sustainable. You are likely to give up on your system and then your photos will have no organization at all. A cumbersome system is likely to take up more of your time than actually looking for a photo every now and then.
Or maybe you are just getting started with photography and haven’t thought about how to organize your photos at all. You may not have enough photos yet that you see the need. But starting out with a good process right away is the best way to go. It will save you a lot of time and effort so you don’t have to go back and reorganize your photos later.
The Tension: By Date or By Subject?
The two main ways people organize their photos are either by date or by subject. Both
methods have strengths and weaknesses. You might create a folder structure by date,
and that will allow you to see everything chronologically. Unfortunately, we all tend
to forget what we did on certain dates, and it might become problematic to find something from two to three years ago.
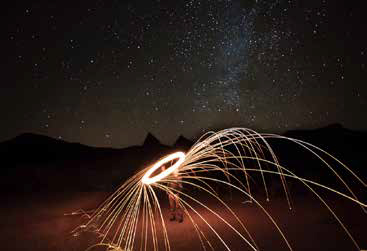
Photo by Jim Hamel
The other way to organize is by subject. That becomes a problem, too. It is hard to sustain, and there might be different subject matter in the same group of pictures. For example, take a look at the photo on the right. This is a night shot I took where I was playing with steel wool lit on fire in a park in northwest Texas. Into which folder should I put the photo? A Texas folder? Or perhaps a state parks folder? Or perhaps a night photography folder? Or maybe one for spinning fire shots and other such trickery? As you can see, it would be confusing. The temptation is to start duplicating the photos and putting them in multiple folders, which is just a waste. I use a system that gives you the best of both worlds and it’s really easy.
The Simple System
First, download your photos to your computer as your normally do. When you do so, a folder with the date will be created. Now, rename the folder you just created, keeping the date, but also adding a short description at the end. For example, if the folder that was created says “2017-12-09” and it contains images you took on a trip to New York, just add the words “New York” to the end. Now the folder reads: 2017-12-09 New York. Or if you took pictures at your child’s birthday party, add the words “Birthday Party” to the folder after the date. And so on. Do this to all the folders you create. Here is a snip of my hard drive so you can see how this folder structure will look:

That’s it! You’re done.
Taking this step will do two things for you. It will keep your photos in chronological order, which is important because your brain often works in terms of chronology. We usually have at least a rough idea when we did something. You can go to the folder for any particular year and scan it quickly to find what you need. In addition, having added the description will now let you know the subject of each folder. The subject is in the name so you never have to spend any time going through the folders.
Using this System in Lightroom
If you just organize your photos on your hard drive, you are done. But many photographers use Lightroom, which offers other organizational features that you can add on to this system. How does that work?
It is really pretty easy. First of all, when you import your photos, Lightroom will use the
exact same folder structure you created on your hard drive, so the system you created
above will also work in Lightroom. For example, looking at the structure we created before, here is how it will look in Lightroom:

When I am looking for a picture, this is more than enough to let me find it quickly. If you want to use any of the other Lightroom tools to organize your photos, you can add them on. The best such tool is Collections. This is just a separate grouping of photos on whatever basis you want. Lighroom doesn’t actually move the photos, but it will look that way on your screen. To create a Collection, you simply press the plus sign, name it
whatever you want, and the drag some photos into it. This is great if you are creating a group of photos from multiple dates.
What about keywords? Put simply, forget about them. Unless you are selling stock photography, I wouldn’t even bother with them. You will spend more time keywording
photos than you will spend looking for photos. All you are doing here is adding a little one- to three-word description to the chronological folder structure that your computer is making.
It is really simple to do, and it takes virtually no time, so you will do it every time. It is all
you ever need to do to stay organized. I have shown many people this system, and it seems to work for just about everybody.

Jim Hamel
Jim Hamel is not just a great photographer, writer, and teacher, he’s also one of our very own TAPC members. Check out his free photography guides and tutorials at Outdoor Photo Academy. You can also see this original unedited article.
